
Anyone who has spent any amount of time using browsers has likely come across and utilized a variety of different browser extensions. Whether it was a grammar checking extension that would evaluate things that the user was writing in real time for tone, grammatical correctness, and otherwise, or another extension for blocking advertisements, one needs only to use them for a brief bit of time to realize how useful these tools are.
In addition to this, with the recent popularization of AI, many people have begun to realize how versatile and applicable this tool is as well. Combining this then with chrome extensions can result in some seriously powerful products, which I hope to demonstrate, albeit in a rather simple fashion.
Extension Fundamentals
Manifest File
The first of four major files that we will be covering in the process of creating a Chrome extension will be the manifest file, which will serve as the foundation for your extension. Things like your extension’s description, version, whether or not it will be using content scripts or service workers, or what permissions it will need to run will be contained within this file. This file is stored in the root directory of your extension, named the “manifest.json” file.
Content Script
Second among these parts of your extension is the content script. Content scripts are scripts that run within the context of the web page that is currently being viewed. These scripts are able to interact with the parent page’s DOM (Document Object Model) in a variety of different ways, as well as taking information in and passing it along to the service worker and extension. This file will be stored alongside the manifest file in the root, this time named “content-script.js.”
Service Worker
Third among them is the service worker. An extension’s service worker functions by acting as a sort of central event handler in the background for your extension, interacting within the context of the browser itself, rather than just the individual page, like a content script. This file will also be stored within the root of the extension as the “background.js” file.
Artificial Intelligence and Machine Learning
For the purposes of this project, the final major component to be addressed will be our interaction with OpenAI’s API. For each piece of text selected to be summarized, we will be sending a request containing that text through the API, which will then return us the result once it has been summarized by OpenAI’s AI.
Manifest File
{ "manifest_version": 3, "name": "Sample AI Chrome Extension", "version": "1.0.0", "description": "A sample chrome extension built using AI and ML that allows users to summarize text", "permissions": [ "storage", "activeTab", "background", "tabs", "webNavigation" ], "background": { "service_worker": "service-worker/service-worker.js" }, "content_scripts": [ { "js": ["content-script/content-script.js"], "matches": ["<all_urls>"], "run_at": "document_end" } ], "action": { "default_popup": "index.html", "default_title": "Sample AI Chrome Extension" } }
As previously said, the manifest is going to be our most important file. Each of the following sections provides Chrome with the important information that allows our extension to function. We will now review the most important pieces of our manifest.
Descriptors: To begin, there are a few properties that we have, namely, manifest_version, name, extension version, and description that are generally self-explanatory.
Permissions: The first major thing of note will be our permissions
array. Though again, self-explanatory, the permissions that we decide to list here are those things which will enable us to do cool things with our extension. Want to access chrome local storage? You are going to need the storage permission. Want to make a context menu for your extension? You will need the contextMenus permission, and so on. A full list of these can be found here.
Content Script and Service Worker: The next two things of major importance are our background and content script objects. (Something worth noting here, in manifest version 2, what we now call the service worker was called the background script. This is the reason the property in our manifest file is still called “background.”).
For our background script, the only thing being defined is where the file is going to be located. For our content script, not only do we detail where that file will be stored in the js key, but also on what urls the content script will activate (in our case, all urls) and when our content script will run (in our case at document end).
Do note that the paths for both files are where they are when the project is built. In my case, my project folder after building is called dist, and I find my service worker and content script in dist/service-worker/service-worker.js and dist/content-script/content-script.js accordingly.
Action: Our final property in the manifest file “action” defines how our extension functions on the chrome toolbar. In our case, our extension UI is defined as the default popup in the “default_popup” field, and “default_title” is the title of our extension in the toolbar.
Content Script
document.addEventListener("mouseup", () => { const selectedText = window.getSelection().toString().trim(); if (selectedText.length > 0) { chrome.runtime.sendMessage( { type: "SELECTED_TEXT", payload: selectedText, }, (response) => { console.log( "Content Script received response from service worker", response ); } ); } });
The job of our content script is to collect information from the page, send it to the service worker, and then send it back to the extension itself to be utilized.
In my content script, for instance, I want to be able to select text from a webpage, send that to my service worker, and then send that to my extension.
After saving the selected text using the mouseup event, this is done using the following syntax: (1) chrome.runtime.sendMessage({type: “MESSAGE_NAME_HERE”, payload: dataIWantToSend}, (response-I-will-receive-from-message-recipient) => {…});
In our example, the type is what you will use to call on that message later on. It acts as an identifier.
The payload, like the name suggests, is the payload, or data that you want to send upstream.
After that message object is defined, we have an optional callback we can pass as a second argument to the sendMessage() method.
This callback takes “response” as an argument, which will be the response that is sent back to the content script after the message is received either by the service worker or the extension itself.
Service Worker
chrome.runtime.onMessage.addListener((message, sender, sendResponse) => { if (message.type === "SELECTED_TEXT") { console.log("Received selected text from content script"); chrome.storage.local.set({ selectedText: message.payload }, () => { sendResponse({ status: "Service worker received selected text", length: message.payload.length, }); }); return true; } else if (message.type === "GET_SELECTED_TEXT") { console.log("Received get selected text request from SummarizeOptions"); chrome.storage.local.get("selectedText", (result) => { sendResponse({ status: "Service worker sent selected text to button on extension", content: result.selectedText, }); }); return true; } });
Inside of our service worker, we are receiving the message sent from our content script and doing something with it before the application requests it.
This onMessage.addListener() method is the thing that anticipates the message from our content script. It has a few different parameters that are available to us.
First is the message, which is of course an object containing the message being sent and all the information that pertains to it.
Second is the sender, which is an object containing the information relevant to who is sending this message, in this case, it is our content script.
Thirdly and finally is sendResponse. Like we mentioned earlier in the content script, this is the piece of data that we send back to the sender.
In my service worker then, whenever I receive a message, I check if the message.type is either “SELECTED_TEXT” or “GET_SELECTED_TEXT.” The first of those is the SELECTED_TEXT that we sent from our content script. After verifying that the message type is correct, the service worker then stores the message.payload in chrome storage under the identifier “selectedText.”
Why not just store it in a local variable while waiting for the request from the extension for this text? It is because chrome extension service workers are what is called “ephemeral.” What this means is that when service workers are not actively doing something, they effectively “turn off.” When this happens, they lose their state, and anything that was defined during that time. For this reason then, so that we don’t pass along an undefined variable, we save the text to chrome storage to be accessed later.
After this, we call our sendResponse argument, letting our content script know that our service worker has received the message.
Finally, the reason we return true at the end is so that our message channel will be held open, allowing asynchronous actions to actually occur. If we do not do this, we will receive an error if we attempt to do anything further in the listener after it has closed.
The second onMessage listener is largely identical in structure to the first, except that instead of setting something to chrome storage, we are instead getting it from chrome storage and sending it to the extension for use.
API Request
const apiKey = import.meta.env.VITE_OPENAI_API_KEY; if (!apiKey) { throw new Error( "VITE_OPENAI_API_KEY is not defined in environment variables" ); } export function summarizeText(text) { return fetch("https://api.openai.com/v1/chat/completions", { method: "POST", headers: { "Content-Type": "application/json", Authorization: `Bearer ${apiKey}`, }, body: JSON.stringify({ model: "gpt-4o-mini", messages: [ { role: "user", content: `Summarize the following text: ${text}`, temperature: 0.7, }, ], }), }) .then((response) => { if (!response.ok) { throw new Error(`Response failed: ${response.status}`); } return response.json(); }) .then((data) => { console.log("Summary:", data.choices[0].message.content); return data.choices[0].message.content; }) .catch((error) => { return console.error(`Error: ${error}`); }); }
In our first lines of the file housing our API request, we first get our API key, checking to make sure we have one stored in our .env file
After this, we get into the actual request.
Like any other HTTP request made to a REST API, the familiar parts of the request are going to be the need for our endpoint (OpenAI’s endpoints are found here), our method, and our headers. We will be using our API key that we defined at the top of the file for our authorization header.
It must be written as a template literal as follows: `Bearer ${apiKey}`
Additionally, you will want to ensure that your fetch is preceded by a return, else you will not be able to do asynchronous actions with this request.
Then, to begin creating our response, we turn our whole response into JSON, as this is the format expected by the API.
We then define our model in the “model” key.
Then, in our messages array, we define the role of the sender of the request and we include the content of our request, as well as the temperature (a number between 0 and 1 which determines whether the response will be more deterministic or random accordingly).
(It is worth noting that though in our example, the request, the content (which is our prompt to the model) is very simple for readability purposes. This should be made more scrutinizing depending on application so that the AI cannot be tricked into doing things that it ought not. Resolve this by creating a more strict prompt)
After our response body, we go into a “then” chain that helps avoid unhandled exceptions, as well as determining what part of the response object to return, which in this case is, “data.choices[0].message.content;”
Example Request
const handleSelectText = () => { setLoading(true); chrome.runtime.sendMessage({ type: "GET_SELECTED_TEXT" }, (response) => { summarizeText(response.content).then((summary) => { onSummarize(summary); setLoading(false); }); }); };
Now that we have our request built, the last thing is to implement it in the extension itself. My request will look slightly different than yours, but the same principles apply.When we wrote the service worker earlier, we designed it to anticipate the GET_SELECTED_TEXT message type, so here is where we send that message to receive the text to be summarized in the response.
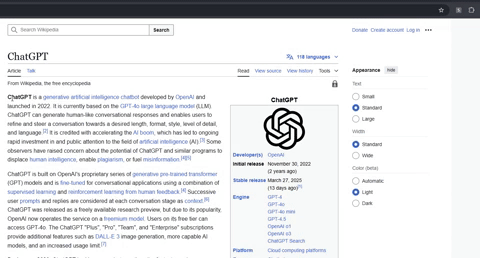
After receiving the text, we pass it as an argument to our summarizeText request, then wait on the summary in a then statement. After receiving, we are able to do whatever we would like with it. After logging in, it is sent to the extension and loaded on the popup like in the following image wherein I summarized the first few paragraphs on the ChatGPT wikipedia page:
Conclusion
With all of the things we have now covered, you have everything you need to go and create your own extension that makes use of the great tool of AI! While the problem we solved today was rather simple, the principles that were applied will remain unchanged for whatever application you can think of.
If you are interested in seeing the project we are currently working on in which this code was implemented, you can find it here.
In the future, I will continue to iterate on this blog, adding new features to the extension and continuing to illustrate the general life cycle of extensions, from development to publishing on the chrome web store. New features will include things like LangChain implementation, context menus and others.
In addition to this blog, I and the other engineers at Software Sushi will continue putting out more blogs similar to this one which I hope you will find helpful!
About the Author
Alexander Tribbey is a Full Stack Engineer who thrives on creating innovative, user-centric web applications. With a strong background in modern front-end frameworks, server-side development, and cloud technologies, he is always eager to explore the latest advances in AI and machine learning. When he’s not building new tools or writing about emerging tech, Alexander collaborates with his fellow engineers at Software Sushi to help businesses deliver impactful digital solutions.


